|
|
|
|
|
|
|
テクパー2020 テクニカルヘルパー |
アンドロイドアプリ開発 |
|
◆ ラジオボタンの配置 |
 2.「 ToolsRadio 」 を書き換え
package com.proto.toolsradio;
import android.app.Activity;
import android.os.Bundle;
import android.graphics.Color;
import android.widget.RadioButton;
import android.widget.RadioGroup;
import android.widget.TextView;
import android.widget.LinearLayout;
import android.view.View;
//import android.view.Window;
public class ToolsRadio extends Activity implements View.OnClickListener {
private final static int MatchParent=LinearLayout.LayoutParams.MATCH_PARENT;
private final static int WrapContent=LinearLayout.LayoutParams.WRAP_CONTENT;
// レイアウトの定義
LinearLayout layout;
/** Called when the activity is first created. */
@Override
public void onCreate(Bundle savedInstanceState) {
super.onCreate(savedInstanceState);
setContentView(R.layout.main);
// setContentView(R.layout.main); 書き換え
// ウィンドウタイトルの非表示
// requestWindowFeature(Window.FEATURE_NO_TITLE);
// レイアウトの生成
// LinearLayout layout=new LinearLayout(this);
layout=new LinearLayout(this);
layout.setBackgroundColor(Color.WHITE); // 背景色の指定
layout.setOrientation(LinearLayout.VERTICAL); // HORIZONTAL, VERTICAL
setContentView(layout);
// テキストの生成
TextView txtView = new TextView(this);
txtView.setTextColor(Color.MAGENTA);
txtView.setTextSize(16f);
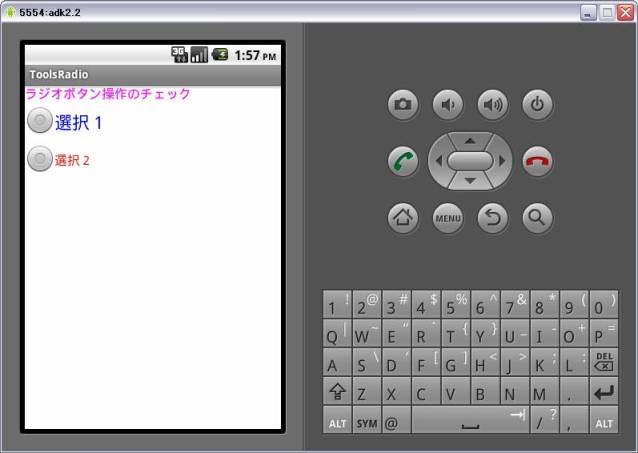
txtView.setText("ラジオボタン操作のチェック");
layout.addView(txtView,
new LinearLayout.LayoutParams(MatchParent,WrapContent));
//ラジオグループの生成
RadioGroup radioGroup=new RadioGroup(this);
// ラジオボタンの生成
RadioButton radioButton=new RadioButton(this);
radioButton.setId(0);
radioButton.setTextColor(Color.BLUE);
radioButton.setTextSize(22f);
radioButton.setOnClickListener(this);
radioButton.setText("選択1");
//ラジオグループに追加
radioGroup.addView(radioButton);
radioButton=new RadioButton(this);
radioButton.setId(1);
radioButton.setTextColor(Color.RED);
radioButton.setOnClickListener(this);
radioButton.setText("選択2");
//ラジオグループに追加
radioGroup.addView(radioButton);
// ラジオグループの指定(レイアウトに追加)
radioGroup.clearCheck();
//radioGroup.check(0);
layout.addView(radioGroup,
new LinearLayout.LayoutParams(WrapContent,WrapContent));
}
@Override
// ラジオボタンクリックの処理
public void onClick(View view) {
// ID情報の取得
int id=(Integer)view.getId();
// ラジオボタン情報の取得
// RadioButton radio=(RadioButton)view;
// テキストの生成
TextView txtView = new TextView(this);
txtView.setTextColor(Color.BLACK);
txtView.setTextSize(22f);
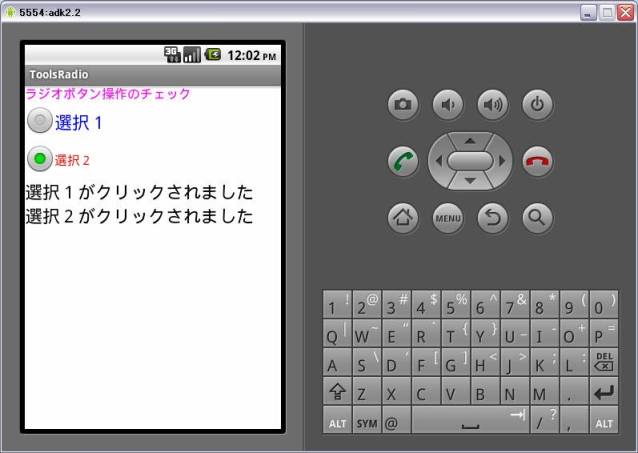
if (id==0) {
txtView.setText("選択1がクリックされました");
}else if (id==1) {
txtView.setText("選択2がクリックされました");
}
layout.addView(txtView,
new LinearLayout.LayoutParams(WrapContent,WrapContent));
}
}
|
public class ToolsRadio extends Activity implements View.OnClickListener {

implements View.OnClickListener の追加
|
android.view.ViewGroup.LayoutParams のViewGroup.LayoutParamsクラスのコンスタント MATCH_PARENT : 親画面と同じ大きさ WRAP_CONTENT : コンテンツに合わせた大きさ |
android.widget.LinearLayout のLinearLayoutクラスの生成 public LinearLayout (Context context) // レイアウトの向きの指定(HORIZONTAL :水平, VERTICAL:垂直) {デフォルトは水平} public void setOrientation (int orientation) |
android.widget.TextView のTextViewクラスの指定 // 文字色の指定 (色コード) public void setTextColor (int color) // 文字サイズの指定 (サイズ) public void setTextSize (float size) // 文字列の指定 (文字列) public final void setText (CharSequence text) |
android.widget.RadioGroup のRadioGroupクラスの生成 public RadioGroup (Context context) // 選択の初期化 public void clearCheck () // 選択ラジオボタンの指定(識別番号) public void check (int id) |
android.widget.RadioButton のRadioButtonクラスの生成 public RadioButton (Context context) |
android.view.View のViewクラスで指定 // 識別子の指定(番号) public void setId (int id) // クリック処理の指定(実行のコールバック) public void setOnClickListener (View.OnClickListener l) // レイアウト(配置)の指定(レイアウト情報) public void setLayoutParams (ViewGroup.LayoutParams params) |
android.widget.LinearLayout.LayoutParams のLinearLayout.LayoutParamsの指定 // 配置パラメータの指定(幅方向,高さ方向) public LinearLayout.LayoutParams (int width, int height) |
android.view.View.ViewGroup のViewGroupの指定 // ビュー(画面)へ項目の追加(ビュー項目,配置パラメータ) public void addView (View child, ViewGroup.LayoutParams params) |
 (選択1をクリック:チェックを外す)
 (選択2をクリック:チェックする)
|
|
|
| Copyright (C) 2010 プログラミングのテクニックをあなたに!!(リトル・ヘルパー) All Rights Reserved. |