|
|
|
|
|
|
|
僥僋僷乕俀侽俀侽 僥僋僯僇儖僿儖僷乕 |
丂傾儞僪儘僀僪傾僾儕奐敪丂 |
|
仧 俧倧倧倗倢倕儅僢僾偺昞帵 丒 俧倧倧倗倢倕偺儅僢僾傪昞帵偟傑偡 |
亂 幚峴 亃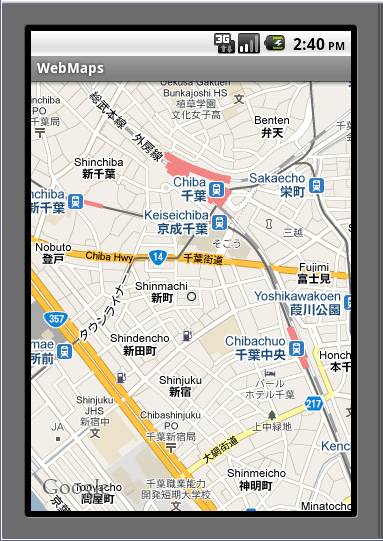
|
<?xml version="1.0" encoding="utf-8"?>
<manifest xmlns:android="http://schemas.android.com/apk/res/android"
      package="com.proto.webmaps"
      android:versionCode="1"
      android:versionName="1.0">
    <application android:icon="@drawable/icon" android:label="@string/app_name">
        <activity android:name=".WebMaps"
                  android:label="@string/app_name">
            <intent-filter>
                <action android:name="android.intent.action.MAIN" />
                <category android:name="android.intent.category.LAUNCHER" />
            </intent-filter>
        </activity>

        <uses-library android:name="com.google.android.maps" />

    </application>

    <uses-permission>
      android:name="android.permission.INTERNET"
    </uses-permission>

</manifest>
|
package com.proto.webmaps;
import android.os.Bundle;
import com.google.android.maps.MapActivity;
import com.google.android.maps.MapController;
import com.google.android.maps.GeoPoint;
import com.google.android.maps.MapView;
//import android.view.Window;
public class WebMaps extends MapActivity {
/** Called when the activity is first created. */
@Override
public void onCreate(Bundle savedInstanceState) {
super.onCreate(savedInstanceState);
// setContentView(R.layout.main);彂偒姺偊
// 僂傿儞僪僂僞僀僩儖偺旕昞帵
// requestWindowFeature(Window.FEATURE_NO_TITLE);
// 儅僢僾價儏乕偺惗惉乮庢摼偺俙値倓倰倧倝倓 俵倎倫倱 俙俹俬 僉乕偺愝掕乯
MapView mapView=new MapView(this,"0mzcivhlTzmQy1M-7pEAag6aQGrDMGiWACCEhHw");
mapView.setEnabled(true);
mapView.setClickable(true);
setContentView(mapView);
// 儅僢僾偺忣曬
MapController mc=mapView.getController();
// 儅僢僾儘働乕僔儑儞乮埵抲乯偺巜掕
乮俧倧倧倗倢倕儅僢僾偺僒僀僩偐傜堒搙乮俉寘乯丄宱搙乮俋寘乯傪庢摼乯
mc.setCenter(new GeoPoint(35609127,140113235));
// 儅僢僾僘乕儉偺巜掕
mc.setZoom(16);
}
// 儖乕僩偺昞帵
@Override
protected boolean isRouteDisplayed() {
return false;
}
}
|
AndroidManifest.xml 偵僞僌傪捛壛 <uses-sdk android:minSdkVersion="8" /> <uses-permission android:name="android.permission.INTERNET"/> |
import com.google.android.maps.MapActivity; 偵曄峏 import android.app.Activity; 丂伀 import com.google.android.maps.MapActivity; |
public class WebMaps extends MapActivity { 偵曄峏
extends Activity丂仺丂MapActivity
|
com.google.android.maps 偺儕僼傽儗儞僗
http://code.google.com/intl/ja/android/add-ons/google-apis/reference/
com/google/android/maps/package-summary.html
|
com.google.android.maps丂偺MapView僋儔僗偺惗惉丄巜掕
public MapView(android.content.Context context,java.lang.String apiKey)
乮apikey 偵俧倧倧倗倢倕儅僢僾偺僒僀僩傛傝庢摼偺
俙値倓倰倧倝倓 俵倎倫倱 俙俹俬 僉乕 偺巜掕乯
// 儅僢僾惂屼偺庢摼
public MapController getController()
|
android.view.View 偺View僋儔僗偺巜掕 乮com.google.android.maps.MapView 偼 android.app.Activity 傪宲彸 // 價儏乕偺桳岠巜掕乮true丗桳岠丄false丗柍岠乯 public void setEnabled (boolean enabled) // 僋儕僢僋僀儀儞僩偺巜掕乮true丗桳岠丄false丗柍岠乯 public void setClickable (boolean clickable) |
com.google.android.maps丂偺MapController僋儔僗偺巜掕 public final class MapController() // 儅僢僾偺拞怱埵抲偺巜掕乮抧棟忋偺埵抲乯 public void setCenter(GeoPoint point) // 儅僢僾偺僘乕儉巜掕乮僘乕儉儗儀儖丗侾乣俀侾乯 public int setZoom(int zoomLevel) |
com.google.android.maps丂偺GeoPoint僋儔僗偺巜掕 public GeoPoint(int latitudeE6, int longitudeE6) 乮latitudeE6丗堒搙丂-80 乣 80乯俉寘 乮longitudeE6丗宱搙丂-180 乣 180乯俋寘 // 僩乕僗僩偺昞帵乮傾僋僥傿價僥傿僆僽僕僃僋僩丆昞帵僥僉僗僩丆暥帤挿乯 public static Toast makeText (Context context, CharSequence text, int duration) |
android.app.Activity丂偺Activity僋儔僗偺巜掕 乮com.google.android.maps.MapActivity 偼 android.app.Activity 傪宲彸 // 傾僋僥傿價僥傿偺價儏乕偵攝抲乮價儏乕乯 public void setContentView (View view) |
 俀乯俧倧倧倗倢倕傾僇僂儞僩偺倂倕倐僒僀僩偐傜儘僌僀儞偟傑偡
乮https://www.google.com/accounts/Login乯
丒俧倧倧倗倢倕傾僇僂儞僩偑側偄応崌偼丄怴婯偵搊榐偟傑偡
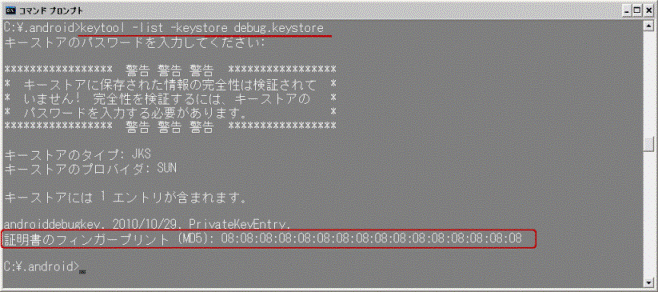
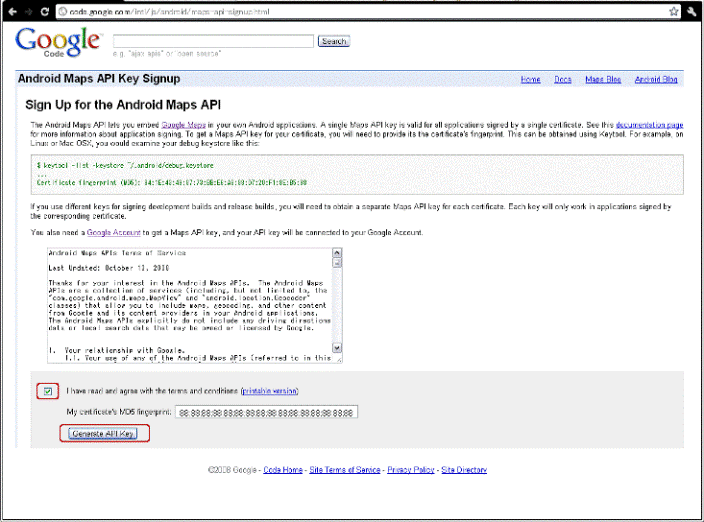
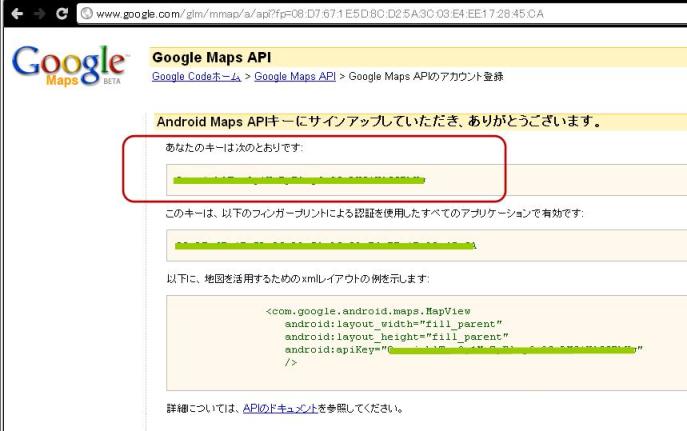
俁乯俙値倓倰倧倝倓丂俵倎倫s丂俙俹俬丂俲倕倷丂俽倝倗倝値倳倫丂偐傜 乽 android:apiKey 乿 傪庢摼偟傑偡
乮http://code.google.com/intl/ja/android/maps-api-signup.html乯
丒僉乕忣曬偺庢摼愝掕
佀 I have read and agree with the terms and conditions (printable version)丂偵僠僃僢僋
佀 My certificate's MD5 fingerprint:丂偵乽徹柧彂偺僼傿儞僈乕僾儕儞僩 (MD5)乿偺抣傪擖椡
佀 乵俧倕値倕倰倎倲倕 俙俹俬 俲倕倷乶傪僋儕僢僋
俀乯俧倧倧倗倢倕傾僇僂儞僩偺倂倕倐僒僀僩偐傜儘僌僀儞偟傑偡
乮https://www.google.com/accounts/Login乯
丒俧倧倧倗倢倕傾僇僂儞僩偑側偄応崌偼丄怴婯偵搊榐偟傑偡
俁乯俙値倓倰倧倝倓丂俵倎倫s丂俙俹俬丂俲倕倷丂俽倝倗倝値倳倫丂偐傜 乽 android:apiKey 乿 傪庢摼偟傑偡
乮http://code.google.com/intl/ja/android/maps-api-signup.html乯
丒僉乕忣曬偺庢摼愝掕
佀 I have read and agree with the terms and conditions (printable version)丂偵僠僃僢僋
佀 My certificate's MD5 fingerprint:丂偵乽徹柧彂偺僼傿儞僈乕僾儕儞僩 (MD5)乿偺抣傪擖椡
佀 乵俧倕値倕倰倎倲倕 俙俹俬 俲倕倷乶傪僋儕僢僋
 丒僉乕忣曬偺庢摼
|
|
|
| Copyright (C) 2010 僾儘僌儔儈儞僌偺僥僋僯僢僋傪偁側偨偵両両乮儕僩儖丒僿儖僷乕乯 All Rights Reserved. |