テクパー2020
テクニカルヘルパー


 アンドロイドアプリ開発 

◆ 画像(イメージ)の配置

1.新規プロジェクトで 「 ToolsImage 」 を新規に作成します

1)ファイル(F) → 新規(N) → プロジェクト(P)

2)Android の Android プロジェクト を選択し、[次へ(N)]ボタン をクリック
・プロジェクト名に 「 ToolsImage 」 を入力
・ビルド・ターゲットの □ Android 2.2 を チェック (最新のバージョン)
・アプリケーション名に 「 ToolsImage 」 を入力
・パッケージ名に 「 任意のドメイン名 」 を入力 (ドメイン名をパッケージ名に利用)
・□ Create Activityがチェック状態で、名称に 「 ToolsImage 」 を入力
・[完了]ボタン をクリック

2.画像(イメージ)を配置します

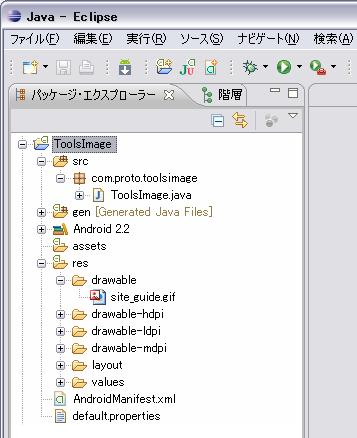
1)resのフォルダー上で右クリック → 新規(W) → フォルダー
・フォルダー名(N)に 「 drawable 」 を入力
・[完了]ボタン をクリック

2)作成した drawable のフォルダー上で右クリック → インポート
・一般 → ファイル・システム
・[次へ]ボタン をクリック
・次のディレクトリーから(Y)に画像(イメージ)があるフォルダーを指定 (参照ボタンで指定)
・取得する画像(イメージ)をチェック
・[完了]ボタン をクリック

(プロジェクトの構成)


3.「 ToolsImage 」 を書き換え
package com.proto.toolsimage;

import android.app.Activity;
import android.os.Bundle;
import android.graphics.Bitmap;
import android.graphics.BitmapFactory;
import android.graphics.Color;
import android.widget.ImageView;
import android.widget.TextView;
import android.widget.LinearLayout;
//import android.view.Window;

public class ToolsImage extends Activity {

    private final static int MatchParent=LinearLayout.LayoutParams.MATCH_PARENT;
    private final static int WrapContent=LinearLayout.LayoutParams.WRAP_CONTENT;

    /** Called when the activity is first created. */
    @Override
    public void onCreate(Bundle savedInstanceState) {
        super.onCreate(savedInstanceState);
        // setContentView(R.layout.main);  書き換え

        // ウィンドウタイトルの非表示
        // requestWindowFeature(Window.FEATURE_NO_TITLE);

        // レイアウトの生成
        LinearLayout layout=new LinearLayout(this);
        layout.setBackgroundColor(Color.WHITE);          // 背景色の指定
        layout.setOrientation(LinearLayout.VERTICAL);    // HORIZONTAL, VERTICAL 
        setContentView(layout);

        // テキストの生成
        TextView txtView = new TextView(this);
        txtView.setTextColor(Color.MAGENTA);
        txtView.setTextSize(16f);
        txtView.setText("画像(イメージ)操作のチェック");
        layout.addView(txtView,
                       new LinearLayout.LayoutParams(MatchParent,WrapContent));

        // イメージ(画像)の取り込み
        Bitmap image=BitmapFactory.decodeResource(getResources(),
                                                  R.drawable.site_guide);

        // イメージ(画像)ビューの生成
        ImageView imageView=new ImageView(this);
        imageView.setImageBitmap(image);
        imageView.setLayoutParams(
                  new LinearLayout.LayoutParams(WrapContent,WrapContent));
        layout.addView(imageView);

        txtView = new TextView(this);
        txtView.setTextColor(Color.BLACK);
        txtView.setTextSize(20f);
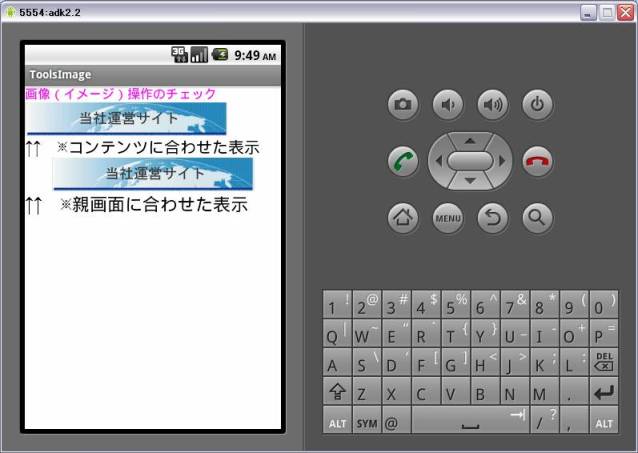
        txtView.setText("↑↑ ※コンテンツに合わせた表示");
        layout.addView(txtView,
                       new LinearLayout.LayoutParams(MatchParent,WrapContent));

        imageView=new ImageView(this);
        imageView.setImageBitmap(image);
        imageView.setLayoutParams(
                  new LinearLayout.LayoutParams(MatchParent,WrapContent));
        layout.addView(imageView);

        txtView = new TextView(this);
        txtView.setTextColor(Color.BLACK);
        txtView.setTextSize(22f);
        txtView.setText("↑↑ ※親画面に合わせた表示");
        layout.addView(txtView,
                       new LinearLayout.LayoutParams(MatchParent,WrapContent));

    }
}


・機能の説明
android.view.ViewGroup.LayoutParams  のViewGroup.LayoutParamsクラスのコンスタント

MATCH_PARENT : 親画面と同じ大きさ
WRAP_CONTENT : コンテンツに合わせた大きさ
android.widget.LinearLayout のLinearLayoutクラスの生成

public LinearLayout (Context context) 

// レイアウトの向きの指定(HORIZONTAL :水平, VERTICAL:垂直)
  {デフォルトは水平}
public void setOrientation (int orientation) 
android.graphics.BitmapFactory のBitmapFactoryクラスで指定

// イメージ(画像)の指定(イメージ・オブジェクト,イメージID)
public static Bitmap decodeResource (Resources res, int id) 
android.widget.ImageView のImageViewクラスの生成、指定

public ImageView (Context context) 

// イメージの指定(ビットマップ・イメージ)
public void setImageBitmap (Bitmap bm) 
android.widget.LinearLayout.LayoutParams のLinearLayout.LayoutParamsの指定

// 配置パラメータの指定(幅方向,高さ方向)
public LinearLayout.LayoutParams (int width, int height) 
android.view.View.ViewGroup  のViewGroupの指定

// ビュー(画面)へ項目の追加(ビュー項目,配置パラメータ)
public void addView (View child, ViewGroup.LayoutParams params) 


5.プロジェクトの実行(実行構成の作成は、「プロジェクトの新規作成」を参照)
1)実行(R) → 実行(R)


Copyright (C) 2010 プログラミングのテクニックをあなたに!!(リトル・ヘルパー) All Rights Reserved.