|
|
|
|
テクパー2020 テクニカルヘルパー |
アンドロイドアプリ開発 |
|
◆ こんにちわの描画 ・ Helloのプロジェクトで「こんにちわ!」を描画します (新規作成した「 Hello 」に変更します) |
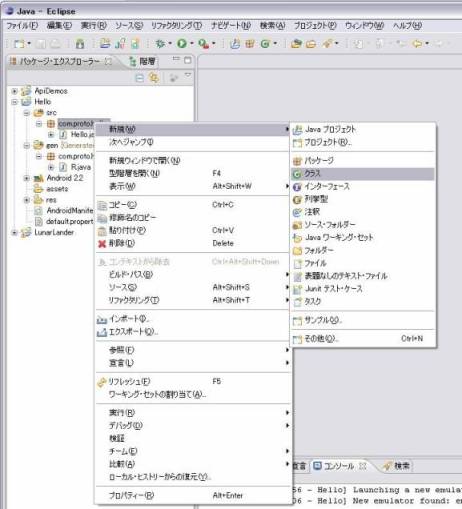 2)新規 Java クラスの作成
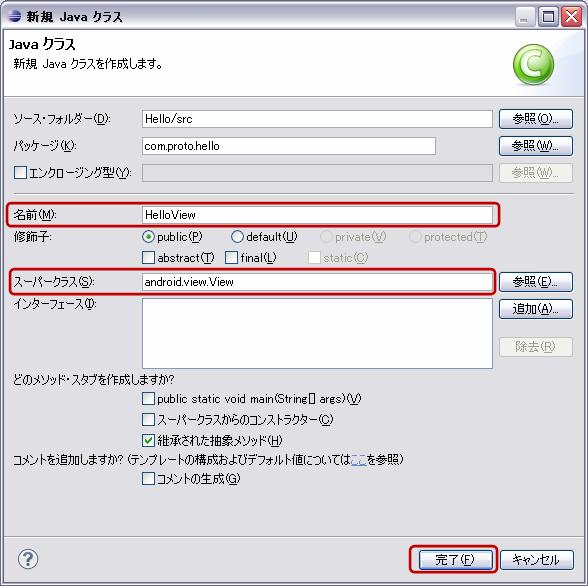
・名前(M)に 「 HelloView 」 を入力
・スーパークラス(S)に 「 android.view.View 」 を入力
・[完了]ボタン をクリック
 3)生成された 「 HelloView 」 を書き換え
・変更前
package com.proto.hello;

import android.view.View;

public class HelloView extends View {

}
|
package com.proto.hello;

import android.content.Context;
import android.graphics.Canvas;
import android.graphics.Color;
import android.graphics.Paint;
import android.view.View;

public class HelloView extends View {

    //コンストラクタ
    public HelloView(Context context) {
        super(context);
        setBackgroundColor(Color.WHITE);
    }

    //描画
    @Override
    protected void onDraw(Canvas canvas) {
        Paint paint=new Paint();
        canvas.drawText("Hello World!",0,12,paint);
    }

}
|
android.view.ViewのViewクラスで背景色の指定

public void setBackgroundColor (int color)
_ setBackgroundColor(Color.WHITE);
_ setBackgroundColor(Color.rgb(128, 128, 128));
_ setBackgroundColor(Color.argb(255, 128, 128, 128));
_ setBackgroundColor(Color.parseColor("white"));
_ setBackgroundColor(Color.parseColor("#FFFFFF"));
|
android.graphics.ColorのColor クラス /* 色コードのコンスタント */ public Color () ・BLACK:0xff000000 ・BLUE:0xff0000ff ・CYAN:0xff00ffff ・DKGRAY:0xff444444 ・GRAY:0xff888888 ・GREEN:0xff00ff00 ・LTGRAY:0xffcccccc ・MAGENTA:0xffff00ff ・RED:0xffff0000 ・TRANSPARENT:0x00000000 ・WHITE:0xffffffff ・YELLOW:0xffffff00 /* 色コードの設定方法 */ public static int parseColor (String colorString) _ colorString の例 #RRGGBB #AARRGGBB 'red', 'blue', 'green' public static int argb (int alpha, int red, int green, int blue) public static int rgb (int red, int green, int blue) |
android.view.ViewのViewクラスで描画の処理 // 描画の処理(オーバーライド) protected void onDraw (Canvas canvas) |
android.graphics.CanvasのCanvasクラスで文字列の描画 public void drawText (String text, float x, float y, Paint paint) |
package com.proto.hello;

import android.app.Activity;
import android.os.Bundle;

public class Hello extends Activity {
    /** Called when the activity is first created. */
    @Override
    public void onCreate(Bundle savedInstanceState) {
        super.onCreate(savedInstanceState);
        setContentView(R.layout.main);
    }
}
|
package com.proto.hello;

import android.app.Activity;
import android.os.Bundle;

public class Hello extends Activity {
    /** Called when the activity is first created. */
    @Override
    public void onCreate(Bundle savedInstanceState) {
        super.onCreate(savedInstanceState);
        // setContentView(R.layout.main);  書き換え
        setContentView(new HelloView(this));
    }
}
|
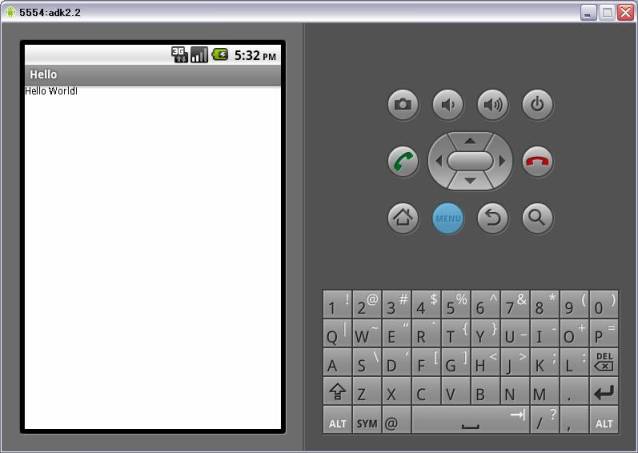 6)描画の機能
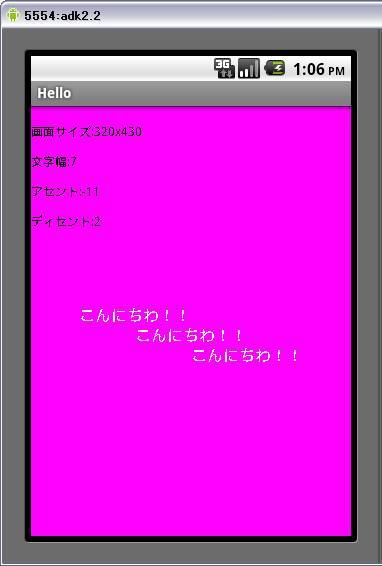
・Paintクラスによる描画の指定 (「 HelloView 」 の書き換え)
package com.proto.hello;

import android.content.Context;
import android.graphics.Canvas;
import android.graphics.Color;
import android.graphics.Paint;
import android.view.View;

public class HelloView extends View {

// コンストラクタ
    public HelloView(Context context) {
        super(context);
        // 背景色の指定 (android.graphics.Colorの定義)
        setBackgroundColor(Color.MAGENTA);
                                          //(0xff888000);
                                          //(Color.parseColor("#FF00FF"));
                                          //(Color.parseColor("white"));
                                          //(Color.argb(255, 128, 128, 128));
                                          //(Color.rgb(128, 128, 128));
    }

    // 描画
    @Override
    protected void onDraw(Canvas canvas) {

        // 描画オブジェクトの生成
        Paint paint=new Paint();
        paint.setAntiAlias(true);         // 文字の縁を滑らかに描く
        paint.setTextSize(12);            // 文字サイズ
        paint.setColor(0xFF000000);       // 文字色

        // 画面サイズの取得(表示)
        canvas.drawText("画面サイズ:"+getWidth()+"x"+getHeight(),0,30,paint);
        canvas.drawText("文字幅:"+(int)paint.measureText("A"),0,30*2,paint);
        canvas.drawText("アセント:"+(int)paint.ascent(),0,30*3,paint);
        canvas.drawText("ディセント:"+(int)paint.descent(),0,30*4,paint);

        // 文字列の描画
        paint.setTextSize(16);            // 文字サイズ
        paint.setColor(Color.WHITE);      // 文字色
        paint.setTextAlign(Align.RIGHT);  // 文字位置
        canvas.drawText("こんにちわ!!",getWidth()/2,getHeight()/2,paint);
        paint.setTextAlign(Align.CENTER); // 文字位置
        canvas.drawText("こんにちわ!!",getWidth()/2,getHeight()/2+20,paint);
        paint.setTextAlign(Align.LEFT);   // 文字位置
        canvas.drawText("こんにちわ!!",getWidth()/2,getHeight()/2+40,paint);

    }

}
|
android.graphics.Paint  のPaintクラスの設定

public Paint ()
public void setAntiAlias (boolean aa)                // 文字の縁を滑らかに描く
public void setColor (int color)                     // 文字色
public void setTextSize (float textSize)             // 文字サイズ
public void setTextAlign (Paint.Align align)         // 文字位置
    (Align.LEFT),  (Align.CENTER),  (Align.RIGHT)
|
android.graphics.Canvas のCanvasクラスで文字列の描画 public void drawText (String text, float x, float y, Paint paint) |
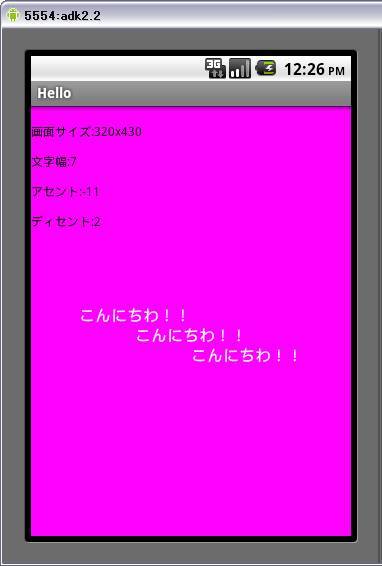 ・実行(R) → 実行(R)
paint.setAntiAlias(false)で指定の描画(文字の縁を滑らかに描かない)
| Copyright (C) 2010 プログラミングのテクニックをあなたに!!(リトル・ヘルパー) All Rights Reserved. |